I did an article on the bolt assembly. In that article I discussed all but two of the major components. The extractor and ejector. Why? Because these two components can be problematic, especially with particular AR-15 platforms, and I believe that they need to have a little more space dedicated to them.
There is no cool factor about the extractor or ejector. There is nothing “sexy” about these two components either. But they will make or break the operation of your AR. Literally. This article is a combination of generic set-up and troubleshooting topics, and the general idea is that if the set-up is done right there’s no troubles to be had.
So, what is the basic job of the extractor and ejector? The extractor and ejector team up to get a spent case out of an AR-15. Simple. That’s what they live their lives for. Granted a grueling and hard life dependent upon a number of circumstances with the AR that they reside in.
If spent cases are not being successfully expelled, the first step is to figure out which piece is at fault. But first, let’s lay some groundwork.
Extractor Tech
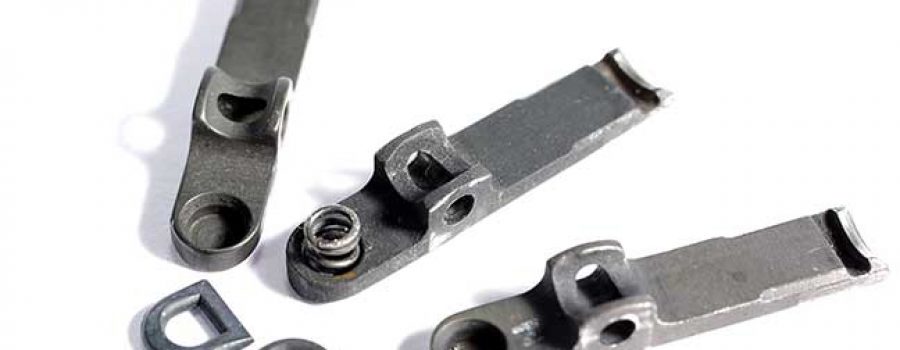
The extractor is essentially a spring-loaded claw that snaps over and into the rim of the cartridge case. Its job is to pull a fired case out of the chamber. Simple. Right? Not always.

Before we dive into principals, let’s take a look at construction of the extractor. Construction material can be a difficult item to determine as most manufacturers of BCG’s and extractors do not openly publish the specifications. Therefore you may have to do some digging, but it is well worth it. In the extractor market you will find MIM construction, you will commonly find 4140 tool steel, 4340 tool steel, S7 tool steel, and a couple of high end exotic materials. My preference for extractors is either 4340 tool steel or S7 tool steel. You will not find these steels in bargain priced extractors. You will also find proprietary extractor designs such as the “lobster tail” that is produced by LMT.

Here is a common sense pro tip. Under no circumstances should an extractor be coated with a “premium” coating. Most coatings reduce friction upon the surfaces that they are applied to. We WANT the spent case to come out of the chamber, especially under extreme fouling or other undesirable operational conditions. Therefore we don’t want the extractor to slip off of the case rim because of a coating that should not have been applied in the first place. Also, always check to make sure that your extractor rotates freely on the extractor retaining pin. I’ve had some that have had undersized holes which causes the extractor to bind. This impedes and provides resistance to the extractor as it pivots.

One more pro tip. The extractor hook groove needs to be at least .070” wide and no more than .073” wide. Too little or too much width of the groove will not provide for the proper grip on the case rim.

One symptom of faulty extraction is that the gun fires and the bolt comes back, and the case is still in the chamber. What’s happened there is that the extractor lost its grip on the rim. Or, perhaps, the case reluctantly released but the extra drag slowed the carrier progress to the point it didn’t make a strong enough run to complete the cycle and the case didn’t eject. In an extreme case, the case stays in the chamber and there’s a chunk missing from its rim or there is a hole in the side of the case! These concerns could be caused by extractor tension concerns or they could be caused by other issues such as chamber concerns or over gassing which creates an overly-quick functioning on the AR during its cycle of operation. More on the latter here soon.
But first, let’s address extractor tension as this is the most common culprit. On an AR-15, an extra-power spring such as the 5 coil extractor springs that Springco makes, or effectively increasing spring pressure through adding a “booster” insert and o-ring, will help prevent the extractor from slipping off and out of the case rim groove. Whatever you do, do not run a combination of the extra power spring, insert, and o-ring! If extractor tension gets too high, it typically doesn’t hurt extraction, but it hammers the case head as the round is chambered. This places undue stress on the extractor, can cause damage to the cartridge case head, can tear the cases when extracting them from the chamber, and it has the possibility to affect overall accuracy due to damaged cartridge components during chambering and inconsistent bolt lock up. If you are running a large frame LR308 platform gun, Springco makes a dual extractor spring upgrade kit that increases extractor tension.

Pro tip. When using a barrel that is 18” or longer, do not use extra power extractor springs. Springco makes a 4 coil extractor spring specifically for this purpose. It provides the spring tension of a standard extractor spring but has the added life span and operational benefits afforded to it by being a CS spring and receiving all of the manufacturing treatments of the other Springco springs as I outlined in the bolt article.
Overall, extraction problems are common and one of the reasons is because of the additional stresses within the gas operating system. This article isn’t about those problems, but it is. Dwell time, gas system length, gas port sizes, and the efficiency of the gas system all have a direct effect on the operation of the AR, and for this article more specifically the extraction process. Shorter gas systems, such as on carbine- and pistol-length barrels, along with the higher-pressure 5.56 NATO-spec ammo common now, create overly-quick functioning. The same can be said of short dwell times, and especially so when combined with the short gas systems that were just mentioned.
If the bolt unlocks too soon, the extractor tries to yank the case out of the chamber before it’s ready to leave. At this point the case has a lot of friction within the chamber because the case is still obturating within the chamber and against the chamber walls. It basically becomes an immovable object at this point. Remember to keep in mind that AR-15 gas operation points of progress are measured in milliseconds. So in this instance we’re talking about fractional milliseconds. So, this is, and isn’t, the fault of the extractor.
Yet another pro tip. If you see bent rims or chunks of rim missing from the case, take a look at the chamber. If the extractor simply lost its grip on the case rim, then a tensioning trick is likely to solve your problems. Ultimately, proper timing of the gun, which includes taming the system operation, goes a long ways to providing reliable functioning.
But what about the real solution? You want the real solution? You can’t handle the real solution! OK…. OK…. OK. The real solution to solving extraction issues is in proper timing of the bolt unlocking, and that’s a main function of the barrel combined with correct optimization of the buffer system. Correct gassing is achieved through a properly cut chamber and throat, and through a proper gas system length combined with correct gas port size. Then we optimize the buffer system through spring rates and buffer weights to aid in delaying the unlocking of the bolt and achieving proper timing of the gun.
You don’t want to replace your barrel and optimize your buffer system? Then there are other options. The most common option that individuals do is to put a band-aid on their gun by installing a stiffer rate buffer spring combined with a heavier buffer. This has many downfalls, but the main one is that this can now induce other functioning concerns.
Here is another pro tip. Black River Tactical makes orifice inserts that you can install into your gas block. You have to make some calculations based upon your current gas port size, gas system length, current buffer spring rate, current buffer weight, what type of ammunition is being used, is it suppressed or not, and more. But once you make your calculations you will end up with a suggested orifice size. You will need to purchase the correct orifice insert along with the install kit that consists of a drill bit and a tap. To install it you will remove your gas block and place it in a vice. Remove your gas block set screws. At this point you will see that the tap is tapered so that it will go through the set hole. You will proceed to carefully drill out the hole in the gas block that goes into the gas tube cavity. Next you will tap this hole with the tap from the kit. Install the new orifice insert until it is just below flush with the gas block bore. Install the gas tube and reinstall the gas block to the barrel. Adjust your buffer system as required. Does this sound intimidating, or more than you want to take on? Contact me, as this is a service that is performed at BRD Gun Works.


With all of this being said, the first suggestion I have is to make sure the chamber is clean. It is a good idea to clean the chamber frequently even if you don’t clean the entire barrel. Pro tip. On new builds part of my service incudes polishing the chamber. This is not difficult, given the right tool set. It doesn’t have to be a mirror finish, nor do you want it to be, you just don’t want it to be rough. This “roughness” is typically caused by tool marks from the chamber reamer. The quality of the chamber reamer as well as the condition of the reamer will have an effect on the overall cut and finish.

If it is a 5.56 NATO the next culprit I look at is headspacing and throat dimension. I see more 5.56 NATO chambers that have the shorter throat of a .223 or .223 Wylde and this can be problematic when using 5.56 NATO ammunition. The result is often signs of overpressure and hard extraction. Sound familiar? If not, reread all of the above.
If I have a combination of concerns such as overgassing and let’s say a short throat (this is commonly seen coming across my bench) then the only true solution is to replace the barrel. The throat can be reamed out to a 5.56 NATO chamber, but then the over gassing still needs to be addressed. By the time you figure in parts and labor required, a barrel replacement is typically cheaper. And it is a better solution as long as the replacement barrel is a quality one.
So far all of this has evolved around the 5.56 NATO. But what if you have other calibers? Well……. While the AR platform can be chambered in an expansive amount calibers, the cold hard truth is that it was designed originally for the .222 which then evolved into the .223 Remington and then the 5.56 NATO chamber. The geometry of the gun is designed around the .223/5.56 case. When we begin to manipulate the feed ramp geometry, magazine feeding geometry, and more importantly and relevant to this article, the bolt face geometry, this is when we begin to see concerns of broken extractors due to modified extractor geometry and broken bolt lugs due to greatly decreasing the web thickness of the bolt. When we look at calibers such as the 6.5 Grendel and the 6.8 SPC there are multiple types. Type I and Type II. Main difference is in the face depth of the bolts for headspacing, but this also effects extractor geometry. Then when looking at the 6.8 SPC they are known to have throat issues similar to the 5.56 NATO and may require the throat to be reamed. So what I’m getting at is with calibers other than 5.56 NATO in the AR-15, the concerns that can evolve around the extractor and extraction process can be more problematic, more in depth, and possibly just a character flaw of a given caliber.

I talked about extractors first because they are the most common area of failure. So, next is what to do when it’s not the extractor’s fault.
Ejector Tech
Here’s what an ejector is supposed to do, and all it’s supposed to do. It is to present the case so that the bolt rotation and travel puts the case out the port. Ejectors in the AR platform are typically S7 tool steel, although there are other metals that do exist, one of which is S2 tool steel.
The ejector is a spring-loaded plunger housed in the bolt face that bears pressure against the left side of the cartridge case base (right hand AR). Its one and only job is to tilt the spent case toward the right, toward the ejection port, so that bolt rotation and rearward movement can pitch the case out of the ejection port.
Unlike with extractors, the good news with ejectors is that, usually, there’s plenty of “spring.” A failure to eject usually is caused by too much spring! If the push is too hard, too soon, the case can crank around excessively and stay in the upper. Ejector over-function is usually the culprit if there’s something weird going on with spent case condition, like dents and creases from hitting off the receiver. Wildly spinning, careening spent cases, cases that are thrown miles away, are typically the result of the ejector pushing too hard too soon.

Pro tip. Clean your chamber! It’s not hard. Use a stiff nylon bristle chamber and extension brush. Finish it off with a chamber mop. Now we fix the above conditions by shortening the spring. Not too much though. We are tuning the spring for proper operation. Cut a little and then try it. Repeat as required. Remember, we will not sacrifice reliability! The gun must operate 100% of the time. Cutting too much spring can cause too little pressure. Continue reading on.
Too little pressure can also keep the case encased in the upper because there’s not enough angle created to head it out of the port. That fix is also easy. Get a new spring, and get a better spring while you’re at it. As I’ve stated many times, I use Springco springs and their ejector springs are in all of my BCG’s. Their ejector spring is a standard power spring that has all of the advantages of their manufacturing processes. They make them for the AR-15 and the large frame LR308 AR’s.
There’s another level to this that most won’t benefit from much, but for a gun that’s fired a lot at a shooting range or is a competition gun, tuning the ejector is possible, and worthwhile. The main effect and reason is to influence the location of the landing place for spent cases, and the distance they fly to get there. As said, a standard ejector spring is almost always capable well beyond the task required of it.
To tune ejection, cut coils. For a competition gun, I typically start at a trimmed overall ejector spring length of 0.800”. That’s usually a big improvement. Whatever you do, don’t start too short, and, as insinuated, you might not want to start at the figure I gave for a standard spring. If there’s not enough power pushing the ejector against the case head, the case can stay inside the upper.
Touching on the other calibers thing as it relates to the ejector. Usually not much is required to be done to the ejector. On .223/5.56/300Blk bolts I will radius and polish the ejector face. This aids in feeding by allowing the cartridge to slide across the ejector more smoothly as it enters the bolt. I have also found that this will typically reduce brass shavings in the upper and bolt assembly that are caused by the ejector. Calibers that have larger rim diameters may benefit from heavily chamfering the right side of the ejector. This is dependent upon if there are ejection concerns and what is contributing to those concerns.
Here’s a HUGE pro tip. There are differences in what I’ll do to a gun that’s used for fun next to one that’s used otherwise, and “otherwise” means that it might, along with its operator, be faced with a circumstance where a malfunction influences his or her capacity to cycle oxygen. That extends to gas system setup, trigger tuning, and a few other range-day tricks that make for a better behaved AR-15 but might limit its absolute capacity for 100 percent function.
Last but Not Least
Take this however you will, but make sure you have an ejector spring installed behind your ejector! They can, and have, been confused with detent springs. Also, I’ve heard of trigger disconnector springs being mistakenly installed under extractors. They too look similar but they do not work the same.

I hope that you have been able to take something away from this article. If nothing else, please remember the following. Guns need to run 100%. The inspections, services, and BRD Gun Works reliability packages address and correct the common deficiencies and failure areas in the AR platform. But when working with defensive or duty style guns, under no circumstances will any service be performed that will render an AR anything less than dependable. The operators of these weapons rely upon that. As you should too if you take on the task of working on or modifying your own firearms.
BRD Gun Works~ Performance you can afford when you can’t afford failure


