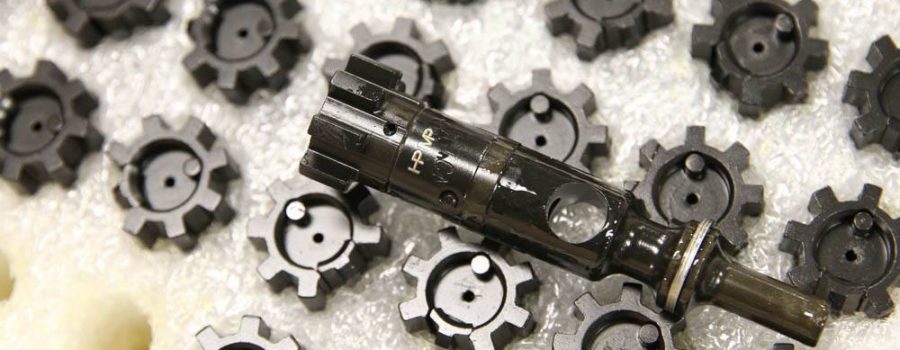
Those looking to go “premium” when building or finishing an AR-15 will often look at an upgraded bolt carrier group (BCG). The primary functioning part in that group is the bolt assembly. The carrier body, as long as it is true USGI standard specification, will give reliable and correct service and provide for a long service life. Most individuals consider plated premium carriers to be nice (read mandatory), mostly because they clean up much easier. I do not as I have seen more AR operational concerns and failures caused by “premium” plating and coatings. Likewise, a higher-dollar carrier won’t make or break your gun, but a sub-standard bolt very well could.

Pro tip. If the carrier is on the shorter end of the TDP, or below it, you could have concerns with BCG free-travel and possible damage to the gas key and/or the lower receiver. This can also be the case if incorrect buffer system parts are utilized.

There are 13 parts in an AR-15 bolt assembly. That is a lot in such a small, but critical package, but it’s a few too many to thoroughly cover in this article. Half of those parts deserve and sometimes demand attention, and some have options.
Bolt Body
As said for the carrier, we need a bolt that’s true USGI standard in specification. The trick is knowing that’s what you’re getting. Parts made by genuine contractors are some assurance.

One part of a Mil-Spec bolt is that it is made from Carpenter 158 steel, but a more prevalent bolt material on the market is 9310 steel. This is sought after due to its lower cost and in a normal market, plentiful abundance. The downside of 9310 steel is that is has to be properly heated treated when used for a bolt, and this process is one that is difficult with 9310. But when the heat treating is done correctly, a 9310 steel bolt has a higher tensile strength. With that said, through testing I have experienced more 9310 bolt failures than C158, and I’ve had many more come across my bench. For what it is worth, C158 is the only bolt that I will put in a defensive or duty gun.

Here is a pro tip. I am very particular about firing-pin hole size. I will not accept one that gauges too big. The TDP outlines a 0.058” diameter firing pin hole. If the hole is bigger than that, then the primer gets weaker and weaker in its puncture resistance, aka: an increased chance of a pierced primer. That’s where there’s a little hole in the center of the primer, through which hot, gritty gas has shot through the receivers, as well as most likely gas cutting the bolt face. You may also experience primer overflow into the firing pin channel of the bolt.

The fit between firing pin tip and firing pin hole has zero to do with it. The best resolution to pierced primers is to get a bolt with a correctly-sized hole as well as a firing pin that provides for the proper amount of firing pin protrusion. I’ll cover this in the next section on the firing pin. I’ve gauged many firing pin holes, from various sources and variously priced, and I’ll put a cap of 0.063” on the upper limit. I’ve seen some that were 0.065” and even bigger. Understand that this may not matter until we’re exploring the upper limits of ammo pressure potentials. It should also be noted that firing pin holes and enlarge in size AND elongate as they wear. While we can gauge the firing pin hole for diameter, a special Go/No Go taper plug gauge is required to check for elongation.
The bolt carrier has zero influence on headspace. That’s all in the bolt. A bolt carrier can typically be swapped without concern. A bolt swap, though, should be checked for headspace using a gauge set. Tolerances are pretty tight on true mil-spec parts, but what should be, and what is, don’t agree with certainty. Get gauges here. Make sure you know if you need .223 Rem. or 5.56 NATO, as they are not interchangeable.

Another pro tip here. I use three headspace gauges when checking 5.56 NATO chambers. I use a .223 Go Gauge (1.4636”), a 5.56 Go Gauge (1.4646”), and a 5.56 No Go Gauge (1.4736”). They should close on both Go Gauges but not the No Go gauge. There is another gauge called a field gauge. You don’t need a FIELD gage for initial headspace check. The Field gauge is used only to inspect well-worn barrels.

Firing Pin
Get the right firing pin. There are two: large collar and small collar aside from the size of the collar they are dimensionally the same. Large collar is for M16 configuration carriers (shrouded firing pin recess) while small collars are for AR-15 format carriers (open firing pin recess), and will work also in an M16 configuration carrier. However, do not use a large-collar pin in an open AR-15-style carrier! Damage to the pin will result.

The small collar came about thanks to ATF regulations in the 1990’s. It is supposed to catch the hammer and prevent firing if the carrier is not fully forward when the hammer releases. This can happen if the hammer is riding the carrier back. If you put a large-collar pin in an un-shrouded carrier, then it can catch on the hammer notch because it’s exposed. The smaller collar on the AR-15 pin was engineered so that the hammer will only catch on the collar if it’s free of both the disconnector and the primary sear.
Another firing pin detail is its protrusion, or maximum amount the pin tip can extend above the bolt face surface. Get a bag full of firing pins and start inspections and you’ll see differences. Honestly, unless you want to buy a premium firing pin (these are, in my experience, machined with close and consistent tolerances), it’s pretty much a hit-miss process to solve an issue. Specs call for 0.028” to 0.036” protrusion, and there are gauges to measure this. Pro tip. My preferred range of firing pin protrusion is .030” to .035”. As I previously stated some calibers in the AR platform require an extended firing pin to provide reliable strikes to the primer. Especially on imported military ammunition. The 7.62×39 in the AR platform is a perfect example of this. Therefore with these calibers you cannot use the above listed specs.

A pin with excessive protrusion will, in fact, weaken a primer. I said that primer pierces are set up by the bolt firing pin hole diameter being excessive, and that’s true, but excessive firing pin protrusion doesn’t help and it can also create pierced primers.
Additionally, and even though it’s not supposed to, the free-floating firing pin can and will “tap” the primer when the bolt slams home. In the case of unshrouded firing pin carriers the firing pin collar won’t always catch on the hammer like it’s designed to do, especially with some aftermarket triggers that may have different architecture. In the case of either style of carrier, this concern is inertia-induced. As such, a combination of a heavy carrier, stout buffer spring, and a firing pin with excessive protrusion can tap hard enough to step up to “strike” status and a slam-fire can occur. Those are dangerous, to say the least.
Clearly, the primer cup composition has a lot to do with its level of sensitivity to firing pin taps.
Cam Pin
The bolt cam pin gets some abuse, especially running higher-pressure ammo and as the cam pin wears and tolerances increase. There’s not really any fitting or tuning or the like that can or needs to be done to the cam pin. They are a consumable item and should be replaced as such when required.

Here is a pro tip. I mark the top of all of the BRD enhanced BCG cam pins so that the cam pin can be oriented each time it is installed after it has been removed. This keeps the wear pattern consistent and aids in reducing the rate of wear to the cam pin and cam pin hole in the bolt. Also, I lubricate the cam pin with a firearm specific grease.


These are 2 separate bolts that failed due to worn cam pins.
Cam pin wear is one of the leading causes of the bolt breaking at the cam pin hole. As the cam pin wears, the tolerance between the cam pin and the cam pin hole in the bolt increase. This increases the shock load on both the bolt at the cam pin hole as well as the cam pin itself. This continual shock loading causes the bolt to stretch and the cam pin hole to elongate. Which in turn increases the amount of shock loading. This continues until a crack develops at the cam pin hole, and if not found during inspections the bolt will eventually break at this point.
There are aftermarket cam pins that have roller assemblies in the head of the pin. I’ve yet to see any positive long term success with these styles of cam pins. But I have seen short life spans and failures on more than a handful of these. Whether it is from the roller failing in the cam pin, or from excessive wear and damage to the upper receiver caused by the roller cam pin. This is another gimmicky no go for me.
Ejector and Extractor Springs
The bolt has an ejector and spring, and an extractor and spring. I replace the springs with aftermarket Springco chrome silicon (CS) springs. Why? Because the Springco CS springs will endure thousands of cycles and is far less prone to breakage. Springco currently has an extractor spring with over 200,000 cycles on it and it is still going.


Breakage is heavily influenced by heat, and CS is more resistant to high temperature. Springco CS springs are also cryogenically treated which improves function and spring life, as well as being imbedded with a moly lubricant which makes them self-lubricating and extends the life of the spring.
If you do not wish to upgrade the extractor and ejector springs, then here’s a couple of things to look for in OEM style extractor springs. The extractor spring insert should be black. This is the latest and greatest insert and it provides resistance against the extractor spring during compression. You should not find an orange spring insert in an AR15. The orange inserts are for full auto guns. Yet another pro tip. The insert should not be hard. If you take the tip of your firing pin and push against it, the insert should have some give to it. If it does not and it is hard, then it is time to replace it with a new one. The extractor spring should also have an o-ring on it. If it does not then the manufacturer either forgot to install it or they are cutting corners to save a few cents. Either way, I have come across way more BCG’s without o-rings than I should. As a side note, the large end of the extractor spring should face down and lock into the extractor. I’ve come across a handful that have been installed upside down.
Gas Rings
All the way at the back of the bolt are three gas rings. These rings won’t last forever. These work the same as piston rings in an engine. They’re there to reduce the flow of gas forward, into the bolt, so that the gasses can act upon the carrier to begin movement of the carrier and unlocking of the bolt. They have zero function in centering or even supporting the back of the bolt. The back of the bolt is supported in the rear of the bolt carrier by the bolt tail support bore. This bore also acts as a rear seal to prevent the gasses from escaping as the carrier moves rearward. When the carrier travels far enough pass the gas rings the rest of the gas will vent out the two exhaust holes in the carrier. These are the two holes that you see when looking at the side of the carrier. Typically you can see the gas rings through these holes also.
Now, I really can’t say when to replace them. Obviously if they are broke you need to replace them. But there are clues. One of which is seeing more grunge building up in the carrier recess. But the real test for checking carrier rings is that with the bolt extended, the carrier should not drop when the BCG is stood straight up on the face of the bolt. If the carrier begins to drop and then stops, or drops all the way down then the rings should be replaced. I did a quick more in depth video of checking gas rings and it can be found on the BRD Gun Works YouTube channel.
Firing Pin Retainer
Firing pin retainers have, in my experience, have hit rock bottom. It’s used and reused dozens and dozens of times, and that’s because it has to get pulled to take the bolt apart, and, of course, replaced to get the bolt carrier group ready for reuse. It’s a simple part, but one I have encountered a rash of both factory-installed and OEM replacements that I will not install.
Recently I purchased bag of 40 firing pin retainers and about three quarters of those I kept. The others went back to the manufacturer or were trashed. Why? Because the legs of the pins were spread excessively. Against popular belief, the legs of the firing pin retainer should not be spread apart very wide. It is not uncommon to receive new pins with excessive width between the legs. For one, this makes them very hard to install, and secondly this does not increase the tension of the pin but can decrease it instead. As well as cause premature pin failure.
I’ve known guys that have stoned the leading edges of the pin legs to aid in installation. Nope. Not me. I have also seen some firing pin retainers that have one leg longer than the other. While these are ok to use, these typically are difficult to install.
Here is another pro tip. Firing pin retainers can be a bear to reinstall. The opposite side on the carrier is beveled inside to aid in the alignment and reinstallation of the pin, but this doesn’t always help. If you turn the pin head horizontal and wiggle it up and down while gently pushing inward, you can typically get a difficult firing pin retainer to go in. This is another subject that I did a video on so check it out on the BRD Gun Works YouTube channel.
What Else is There?
I’ve covered all of the basic components of a bolt except for two. The extractor and the ejector. Due to the importance of these two components for the correct operation of the AR platform, I will be doing a separate write up on them.


As for the rest, I hope that I have provided you with some insight for what to look for when selecting a bolt or a complete BCG. “Premium” What it is not. It’s not “all about the bass,” it’s not about the carrier coating, but it is about the bolt and the components that make up the bolt. What premium is about. It’s about the proper materials. The proper heat treating. The proper dimensions. The proper machining. The proper manufacturing. The proper quality control. And more.
BRD Gun Works~ Performance you can afford when you can’t afford failure


